Understanding of the @Input and @Output decorator with EventEmitter class in Angular.
Today we will understand of what the exact use of @Input and @Output decorator in angular. Also, explore how to use with examples so you can get more idea about this decorator.
Why @Input and @Output Decorator in Angular?
In the simple word, we can say @Input and @Output both are used to share or exchange data between components. We send or receive data between child and parent components.
How to use @Input and
@Output Decorator in Angular?
@Input is used to receive data and @output used to send
data.
1) Example of @Input Decorator in Angular.
@Input is used when any parent component wants to send the data to the child component. Input is help to child component to receive data sent by the parent component. How it is possible to lets’ start with one simple example.
Code Example of
@Input.
Please look into the below code sample carefully for sending data parent to child component.
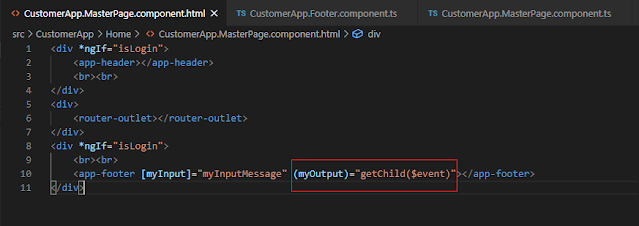
1) Create one parent component let’s say MasterPageComponent. In that component declare one variable called myInputMessage and set the value as “Parent” for sending this data to the child component.
3) <app-footer> which is selector of child component and send data thru [MyInput] variable.
4) [MyInput] carry data to the child component.
5) Let’s create a child component with the name is MainFooterComponent.
6) Please look carefully highlighted line, I have declared @Input decorator with the same name which I have used in master as [MyInput].
7) @Input help to read value sent by master component or we can say receive those value which was sent by master component.
8) In the above example myInput variable is assigned with value “Parent” which is sent by the parent component.
9) Please don’t try to access @Input value within the constructor because It is always found within ngOnOnit() of angular.
Now let's understand the @Output and EventEmitter.
2) Example of @Output Decorator in Angular.
@Output is used when any child component wants to send the data to the parent component. The output is helping to parent component to receive data sent by the child component. @Output binds a property of the type of angular EventEmitter class. How it is possible to lets’ start with one simple example.
Why
EventEmitter?
First we understand Emit meaning. Emit means to produce something. Now we relate this terminology with angular. EventEmitter is used with @Output directives to emit custom events synchronously or asynchronously and register handlers for those events by subscribing to an instance.
Code example
of @Output in Angular.
1) For sending a message from the child to the parent we create one button in the child component which sends a message to the parent component.
2) Open the HTML page of the child component called MainFooterComponent. Write code for the click event of the button, now the view is looking as below.
3) Now register the sendParent() click event on the component side as below.
So this way you can send and receive data using @Input, @output
decorator with the help of EventEmitter.
I hope you have liked this article for the understanding of @Input and @Output decorator with EventEmitter class in Angular.
Please feel free to comment if you have found anything incorrect, or you want to share more information about the topic discussed above.
Please Share this article so it will help to another one because “Helping millions grow better”.
Follow my blog https://mydotnetguru.blogspot.com to read the more interesting technical articles.
Next Recommended Article:
- Optimized top 2 ways to find 2nd or Nth highest salary in SQL Server.
- Different ways to remove or delete duplicate rows from a SQL Table.
- When to use abstract class and interface in C#?
- Async and Await in C#
- Top 100+ popular ASP.Net MVC Interview Questions and Answers.
- Top 100+ popular SQL Interview Questions and Answers Blog.
- Top 100+ popular C# Interview Questions and Answers.
- Dependency Injection and types of dependency injection.


No comments:
Post a Comment